Victron VRM (Victron Remote Management) lets you monitor your entire Victron system from anywhere in the world — your phone, tablet, or computer. You can check battery state of charge, solar yield, inverter load, and receive alerts when something goes wrong. This guide walks through setting it up from scratch.
What You Need for VRM
VRM requires a GX device connected to your Victron equipment and the internet. The GX device collects data from all your Victron devices and uploads it to the VRM cloud portal.
Compatible GX devices:
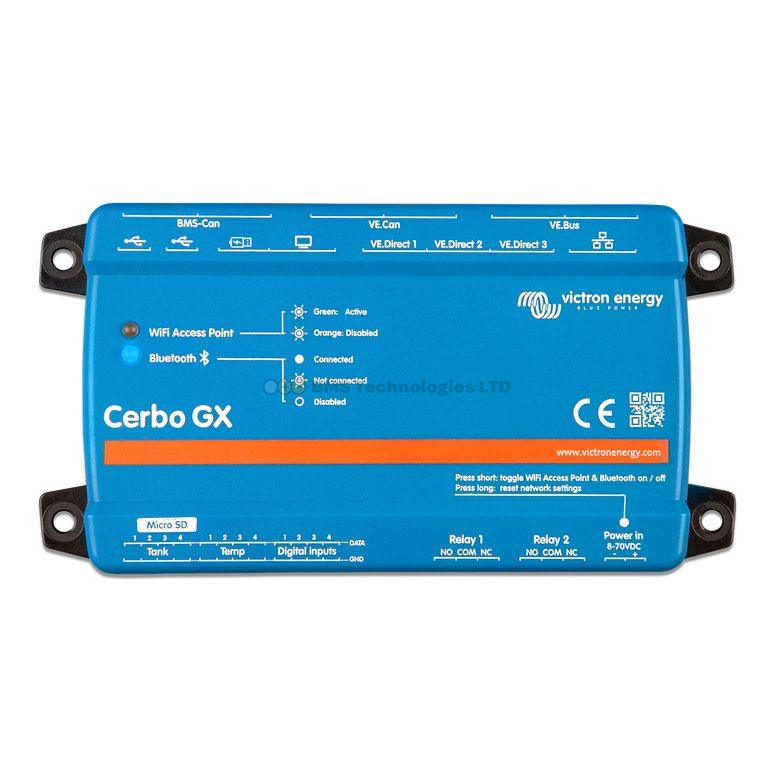
- Cerbo GX — the most popular choice, with Wi-Fi, Ethernet, and multiple VE.Direct/VE.Bus ports
- Cerbo-S GX — smaller version of the Cerbo
- Venus GX — older model, still supported
- Color Control GX — legacy model with built-in display
The GX device connects to your Victron equipment (MPPT, MultiPlus, SmartShunt, etc.) via VE.Direct cables, VE.Bus cables, or VE.Can connections. It then uploads data to the VRM portal via Wi-Fi or Ethernet.
Step 1: Create a VRM Account
- Go to vrm.victronenergy.com.
- Click Create an account.
- Enter your email address and create a password.
- Verify your email address via the confirmation link.
VRM is free for all Victron users. There are no subscription fees for basic monitoring and data logging.
Step 2: Connect Your GX Device to the Internet
Via Wi-Fi
- On the Cerbo GX, navigate to Settings → Wi-Fi.
- Select your Wi-Fi network from the list.
- Enter the password.
- The Cerbo GX will connect and show its IP address.
Via Ethernet
Simply plug an Ethernet cable into the Cerbo GX. It will automatically obtain an IP address via DHCP. Ethernet is more reliable than Wi-Fi for permanent installations.
Via Mobile Data (4G/5G)
For installations without Wi-Fi (off-grid cabins, boats at sea), you can use a GX LTE 4G module or a mobile Wi-Fi hotspot. The GX LTE 4G plugs directly into the Cerbo and provides cellular connectivity.
Step 3: Add the GX Device to Your VRM Account
- On the Cerbo GX, navigate to Settings → VRM Online Portal.
- Note the VRM Portal ID (a long alphanumeric string unique to your GX device).
- In your VRM web dashboard, click Add Installation.
- Enter the Portal ID and give your installation a name (e.g., "My Campervan" or "Boat Solar System").
- The GX device should appear in your VRM dashboard within minutes.
If the GX device is already connected to the internet, it may appear in your VRM account automatically after a short delay.
Step 4: Verify Data Is Flowing
Once connected, check the VRM dashboard. You should see:
- Battery status: State of charge, voltage, current (from SmartShunt or BMV)
- Solar production: Watts, daily yield, charge state (from MPPT controllers)
- Inverter/charger status: AC loads, charging state (from MultiPlus)
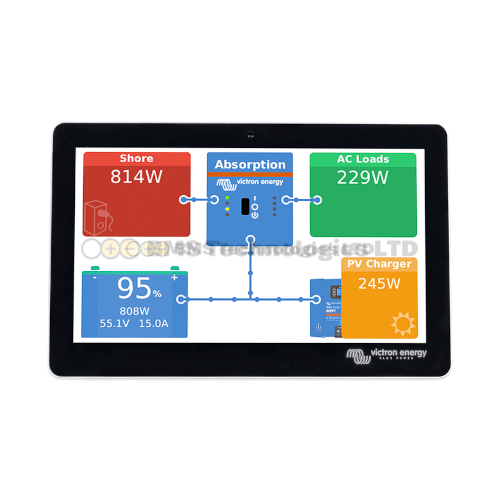
- System overview: A flow diagram showing energy moving between solar, battery, inverter, and loads
Data typically updates every few seconds on the local GX device, and is uploaded to VRM in near-real-time via the internet.
Step 5: Configure Alerts
VRM can send email or push notifications when certain conditions are met. Navigate to Settings → Alarm Rules in the VRM portal.
Useful alerts to set up:
| Alert Type | Recommended Setting | Why It Matters |
|---|---|---|
| Low battery SOC | Below 20% | Battery nearly empty — start charging |
| High battery voltage | Above 14.6V (12V lithium) | Possible overcharging |
| Low battery voltage | Below 11.5V (12V) | Deep discharge warning |
| No data received | After 30 minutes | Internet connection lost or GX device issue |
| Inverter overload | Any occurrence | MultiPlus is struggling with AC loads |
Using the VRM Dashboard
Overview Page
The main dashboard shows a real-time flow diagram of your system. Energy flows are shown as animated lines between components — solar panels, battery, inverter, AC loads, and DC loads. This gives you an instant visual understanding of your system's state.
Advanced Tab
The Advanced tab provides detailed graphs of any parameter over time. You can view:
- Battery voltage and current over hours, days, or months
- Solar yield patterns — useful for identifying shading or panel issues
- AC load profiles — see when peak loads occur
- Temperature trends (if a sensor is connected)
VRM App
The VRM app (iOS and Android) mirrors the web dashboard on your phone. You can check your system status from anywhere with mobile signal. The app supports multiple installations, so if you have both a campervan and a boat with VRM, you can monitor both from one app.
Remote Configuration
VRM isn't just for monitoring — you can also change settings remotely:
- Adjust the MultiPlus input current limit (useful when arriving at a new campsite)
- Switch the inverter on/off
- Change charge parameters
- Start/stop a generator
- Update GX device firmware
Remote configuration requires the Two-way communication setting to be enabled on the GX device (Settings → VRM Online Portal → Two-way communication).
Data Retention and Privacy
VRM stores your system data on Victron's servers. The retention period varies:
- Detailed data (per-second resolution): retained for approximately 6 months
- Aggregated data (hourly/daily summaries): retained indefinitely
You can export data as CSV files for your own analysis. VRM data is private to your account — other users cannot see your system unless you explicitly share access.
Troubleshooting VRM Connection
"GX Device Not Appearing in VRM"
- Verify the GX device has internet access (check Settings → Wi-Fi or Ethernet status).
- Ensure the Portal ID is entered correctly — it's case-sensitive.
- Check that VRM communication is enabled (Settings → VRM Online Portal → Enable).
- Wait 5–10 minutes — initial registration can take time.
"Data Gaps in VRM Charts"
- Intermittent Wi-Fi or cellular signal causes gaps.
- The GX device buffers data locally and uploads when connectivity returns, but there are limits to the buffer size.
- For reliable data, use Ethernet where possible.
Summary
Setting up VRM takes about 15 minutes: create an account, connect your GX device to the internet, and add it to your VRM portal using the Portal ID. Once configured, you get real-time monitoring, historical charts, configurable alerts, and remote control — all free of charge. For any Victron system with a Cerbo GX, VRM is an essential addition that transforms how you understand and manage your energy system.