Victron's Remote Console feature lets you access the full GX device interface from anywhere in the world — as if you were standing in front of it. You can check system status, change settings, update firmware, and troubleshoot problems without being physically present. This is one of the most powerful features of the Victron ecosystem and a major advantage for remote installations. This guide explains how to set it up and use it securely.
What Is Remote Console?
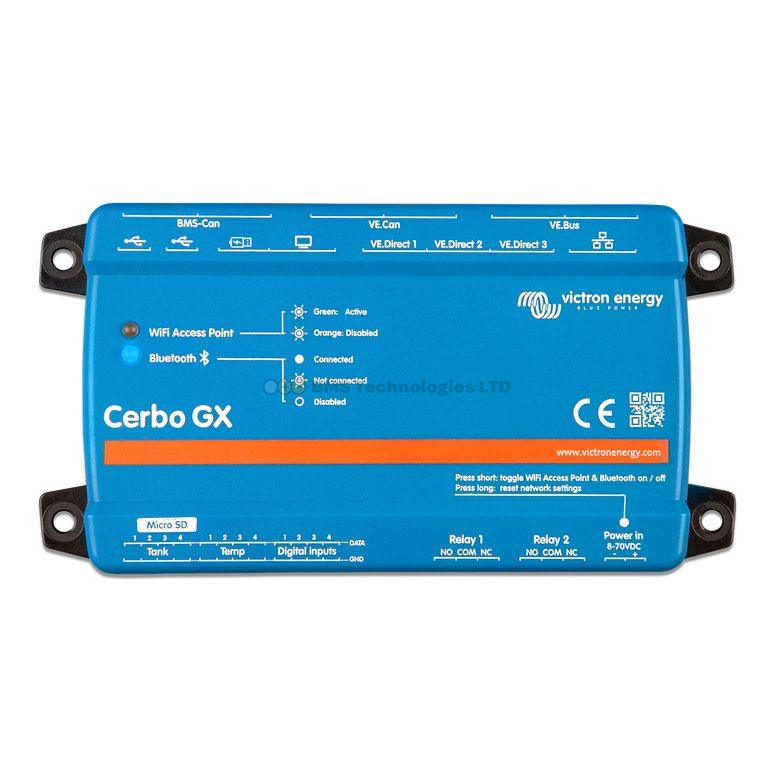
Remote Console is a feature of Victron's GX devices (Cerbo GX, Cerbo-S GX, Ekrano GX, Venus GX) that streams the full device user interface to a remote viewer. Everything you can do on the GX device's local screen or touchscreen, you can do remotely — including:
- Viewing real-time system data (battery voltage, solar yield, AC consumption)
- Changing inverter/charger settings (charge current, AC input limit, etc.)
- Switching the system between operating modes (on, off, charger-only, inverter-only)
- Monitoring alarms and notifications
- Updating firmware on the GX device and connected products
- Viewing detailed device status for every connected Victron product
Two Ways to Access Remote Console
1. Via VRM (Over the Internet)
The most common method. Access your GX device from anywhere with an internet connection through the VRM portal.
Requirements:
- GX device connected to the internet (Ethernet or WiFi)
- VRM account with your installation registered
- Remote Console enabled on the GX device (enabled by default on newer firmware)
How to access:
- Log into vrm.victronenergy.com from any web browser
- Select your installation from the list
- Click the "Remote Console" button (usually in the top right or in the left-hand menu)
- The GX device interface loads in your browser window
- Interact with the interface exactly as you would on the physical device
The VRM mobile app also provides Remote Console access on iOS and Android devices.
2. Via Local Network (LAN)
If you are on the same network as the GX device (connected to the same router via Ethernet or WiFi), you can access Remote Console directly without going through VRM.
How to access:
- Find the GX device's local IP address (shown on the GX device under Settings > Ethernet or Settings > WiFi)
- Open a web browser on any device on the same network
- Navigate to http://[GX-IP-address] (for example, http://192.168.1.50)
- The Remote Console interface loads directly
You can also use the hostname: http://venus.local on most networks (mDNS/Bonjour must be supported on the viewing device).
Local access is faster than VRM because the data does not travel via the internet. It is also available even if the internet connection is down.
Enabling Remote Console
On the GX Device
- Navigate to Settings > Remote Console on the GX device
- Enable "Remote Console on VRM" to allow internet access
- Enable "Remote Console on LAN" to allow local network access
Password Protection
By default, Remote Console via LAN has no password. Remote Console via VRM uses your VRM account login for authentication. You can optionally set a password for LAN access:
- Go to Settings > Remote Console on the GX device
- Set a password under "Remote Console on LAN — Password"
- Anyone accessing via LAN will need this password
Recommendation: Always set a LAN password if your GX device is on a shared network (marina WiFi, campsite WiFi, or any network where other users have access). Without a password, anyone on the same network can access your system controls.
What You Can Do via Remote Console
Real-Time Monitoring
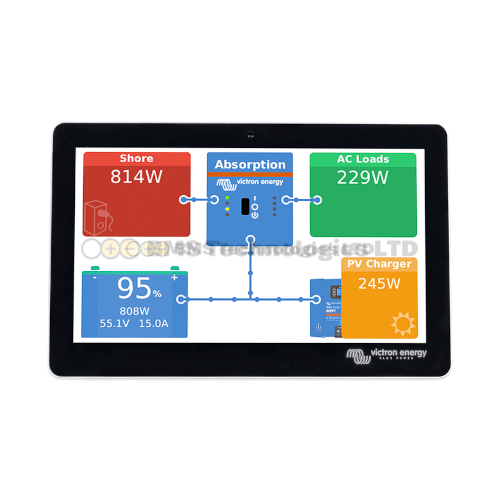
The overview screen shows the same energy flow diagram as the physical GX device — battery state of charge, solar production, AC loads, and grid/generator status. Data updates in real time with approximately 1-second resolution.
System Configuration
All GX device settings are accessible, including:
- ESS (Energy Storage System) settings — grid setpoint, minimum SOC, scheduled charging
- Battery settings — charge voltages, current limits, battery type selection
- Inverter/charger control — switch mode, AC input current limit, PowerAssist settings
- Generator start/stop — automatic generator control based on battery SOC or load
- Network settings — WiFi, Ethernet, VRM configuration
- Alarm settings — configure alarm thresholds and notification preferences
Firmware Updates
You can update the GX device's own firmware (Venus OS) remotely via Settings > Firmware > Online updates. You can also trigger firmware updates on connected VE.Bus and VE.Can products through the Device List. See our firmware update guide for the full process.
Device Monitoring
Navigate to the Device List to see every connected Victron product with its real-time status, including:
- MPPT controllers — PV voltage, charge current, daily yield, state (bulk/absorption/float)
- MultiPlus/Quattro — AC input/output, charge/inverter status, temperature
- SmartShunt — battery voltage, current, SOC, time remaining
- Temperature sensors — current readings from all connected sensors
Security Considerations
VRM Security
Remote Console via VRM is secured by your VRM account credentials. Protect your account with a strong, unique password. Victron also supports two-factor authentication (2FA) on VRM accounts — enable this for an additional layer of security.
LAN Security
Remote Console via LAN is only as secure as your local network. On a private home network, the risk is minimal. On shared or public networks:
- Always set a LAN password on the Remote Console
- Consider disabling LAN Remote Console entirely if you only access it via VRM
- Be aware that unencrypted network traffic could theoretically be intercepted on an untrusted network
What Could Go Wrong
An unauthorised person with Remote Console access could:
- Switch your inverter off, cutting power to your installation
- Change charge settings, potentially damaging batteries
- Modify ESS settings, causing unexpected grid export or import
- Trigger firmware updates at an inconvenient time
None of these are catastrophic — Victron products have built-in safety limits that prevent truly dangerous conditions — but they could be inconvenient and confusing. Treat Remote Console access with the same care you would treat access to any other device that controls your electrical system.
SSH Access for Advanced Users
GX devices running Venus OS also support SSH (Secure Shell) access for command-line interaction. This is an advanced feature intended for developers and advanced users who want to:
- View system logs for troubleshooting
- Install custom scripts or integrations
- Access the underlying Linux operating system
- Debug communication issues between devices
Enabling SSH
- On the GX device, go to Settings > General > Set root password
- Set a password (this enables SSH access)
- Connect via SSH using ssh root@[GX-IP-address] from a terminal on your computer
- The default SSH port is 22
Remote SSH via VRM
Victron also provides SSH access through VRM for GX devices that are online. This tunnels through Victron's servers, allowing SSH access without needing to configure port forwarding on your router.
Warning: SSH gives you full root access to the GX device's operating system. Incorrect commands can render the device non-functional. Only use SSH if you are confident with Linux command-line tools. If something goes wrong, a Venus OS reinstall via SD card will restore the device.
VNC Access
Remote Console uses a VNC-like protocol under the hood. While Victron's official access is through VRM and the LAN web interface, advanced users can also connect using a standard VNC client:
- Ensure Remote Console on LAN is enabled
- Open a VNC client (such as RealVNC Viewer, TightVNC, or the built-in macOS Screen Sharing)
- Connect to [GX-IP-address]:5900
- Enter the LAN password if configured
VNC access provides the same interface as the web-based Remote Console but may be more convenient if you already use VNC tools for other purposes.
Troubleshooting Remote Console
Remote Console Not Loading via VRM
- Check internet connection — verify the GX device is online (Settings > VRM online portal should show "Last contact" within the last few minutes)
- Check VRM setting — ensure "Remote Console on VRM" is enabled in Settings > Remote Console
- Clear browser cache — sometimes a stale cache prevents the Remote Console from loading correctly
- Try a different browser — some browser extensions (ad blockers, privacy tools) can interfere with the WebSocket connection used by Remote Console
Remote Console Not Loading via LAN
- Verify the IP address — the GX device's IP may have changed if DHCP assigned a new address. Check the device directly or your router's client list.
- Check LAN setting — ensure "Remote Console on LAN" is enabled
- Same network — your computer/phone must be on the same network as the GX device
- Firewall — check that your computer's firewall is not blocking connections to the GX device's IP
Slow or Laggy Remote Console
- Internet speed — Remote Console via VRM requires a reasonable internet connection on both ends. Slow upload speed at the GX device's location is the most common cause of lag.
- Use LAN instead — if you are on the same network, the LAN connection is always faster and more responsive than VRM
- Reduce load — close other browser tabs and applications that may be consuming bandwidth
Practical Use Cases
- Holiday home monitoring — check your off-grid system's battery state and solar production without visiting the property
- Boat at the marina — verify shore power is connected and batteries are charging from your home
- Installer support — share VRM access with your installer so they can diagnose issues remotely, saving a site visit
- Seasonal adjustments — change ESS settings, generator schedules, or charge parameters remotely as seasons change without travelling to the installation
- Emergency response — if an alarm notification arrives via email or the VRM app, immediately check the system via Remote Console and take corrective action
Remote Console is a standout feature that sets Victron apart from competitors. Combined with VRM's historical data and alarm system (see our VRM dashboard guide), it gives you complete visibility and control over your system from anywhere. Make sure your GX device is connected to the internet to take full advantage. Compare UK prices on GX products using our price comparison tool.