The Victron Cerbo GX is the brain of any serious Victron energy system. It connects all your Victron devices — MPPT controllers, inverters, battery monitors, chargers — into one unified system with monitoring, control, and remote access via VRM. If you're new to GX devices, the setup process can feel daunting. This guide takes you through every step.
What the Cerbo GX Does
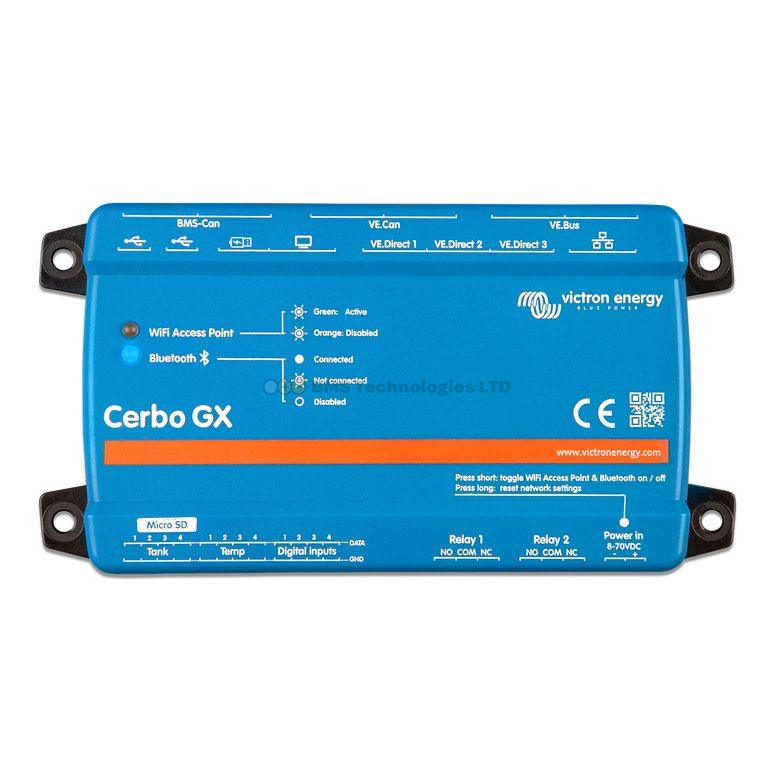
The Cerbo GX is a communication hub. It doesn't produce or store energy — it collects data from all your Victron devices, displays it on a connected screen or remotely via VRM, and coordinates system behaviour (like DVCC for synchronised charging).
Key capabilities:
- Connects up to 3 VE.Direct devices (MPPT controllers, SmartShunt, Phoenix inverters)
- Connects to MultiPlus/Quattro via VE.Bus
- USB ports for additional VE.Direct devices (via USB-to-VE.Direct interface)
- Wi-Fi and Ethernet for internet connectivity and VRM portal
- Bluetooth for VE.Direct-connected Victron devices
- HDMI output for the optional GX Touch 50 or GX Touch 70 display
- CAN-bus for newer devices (Lynx Smart BMS, Orion XS) and third-party batteries
- Relay outputs for generator auto-start, alarms, etc.
What's in the Box
- Cerbo GX unit
- Power cable (VE.Direct connector for power supply — typically powered from your battery via the included cable, or from a VE.Bus device)
- Mounting screws and bracket
- Quick start guide
Not included: GX Touch display (sold separately), VE.Direct cables, VE.Bus cables, Ethernet cable.
Step 1: Mount the Cerbo GX
Mount the Cerbo in a dry, ventilated location with easy access to its ports. Common locations:
- Campervans: Inside the electrical cupboard, near the battery bank
- Boats: In the chart table area or engine room (ensure ventilation)
- Off-grid homes: Near the inverter and battery, in a utility room
The Cerbo is not waterproof — it needs to stay dry.
Step 2: Connect Power
The Cerbo GX can be powered in two ways:
- Via the Power In connector: Connect the included power cable to your 12V or 24V battery (8–70V input range). Add a fuse (3A) near the battery.
- Via VE.Bus: If connected to a MultiPlus via VE.Bus, the Cerbo can draw power from the VE.Bus cable. No separate power cable needed.
The Cerbo draws approximately 3W — negligible for any battery system.
Step 3: Connect Your Victron Devices
VE.Direct Devices (MPPT, SmartShunt, Phoenix Inverter)
Connect up to 3 VE.Direct devices using standard VE.Direct cables (available in various lengths). Simply plug the cable into the Cerbo GX's VE.Direct ports and the device's VE.Direct port. The Cerbo auto-detects connected devices.
If you have more than 3 VE.Direct devices, use a VE.Direct to USB interface cable connected to one of the Cerbo's USB ports.
VE.Bus Devices (MultiPlus, Quattro)
Connect your MultiPlus or Quattro using a standard RJ45 VE.Bus cable (looks like an Ethernet cable but connects to the VE.Bus port). The Cerbo's VE.Bus port provides full monitoring and control of the inverter/charger.
CAN-bus Devices
Newer devices like the Victron Lynx Smart BMS and some third-party lithium batteries communicate via CAN-bus. Connect using the appropriate CAN-bus cable to the Cerbo's VE.Can port.
Step 4: First Power-On and Initial Setup
When the Cerbo GX powers on for the first time, it runs through a brief boot sequence (about 60 seconds). If you have a GX Touch display connected via HDMI, you'll see the startup screen followed by the main dashboard.
Set the Language
Navigate to Settings → Display & Language → Language and select your preferred language.
Connect to Wi-Fi
Go to Settings → Wi-Fi, select your network, and enter the password. An Ethernet cable provides a more reliable connection if available.
Set the Date and Time
If connected to the internet, the Cerbo GX sets the time automatically via NTP. If offline, set it manually under Settings → General → Date & Time.
Step 5: Update Firmware
Check for firmware updates immediately after first setup. Navigate to Settings → Firmware → Online Updates. If an update is available, install it. Firmware updates add features, fix bugs, and improve compatibility with newer Victron devices.
The Cerbo can also update the firmware of connected VE.Direct and VE.Bus devices — a very convenient feature.
Step 6: Configure System Settings
Battery Monitor
Navigate to Settings → System Setup → Battery Monitor. Select the device that should be the primary battery monitor — usually your SmartShunt or BMV. If you don't have a dedicated battery monitor, the Cerbo can use the MultiPlus's internal measurement (less accurate).
System Voltage
The Cerbo auto-detects your system voltage (12V, 24V, or 48V). Verify it's correct under Settings → System Setup.
DVCC (Distributed Voltage and Current Control)
DVCC is a powerful feature that lets the Cerbo GX coordinate charging across all connected devices. Enable it under Settings → DVCC.
With DVCC enabled:
- The Cerbo sets charge voltage and current limits for all connected chargers based on the battery monitor's data.
- If your lithium BMS sends charge limits via CAN-bus, the Cerbo enforces them across all chargers.
- Multiple MPPT controllers and the MultiPlus charger work together rather than independently.
DVCC is recommended for all systems with a Cerbo GX, especially those with lithium batteries and BMS communication.
Step 7: Connect to VRM
See our VRM setup guide for detailed instructions. In brief:
- Create a VRM account at vrm.victronenergy.com.
- Note the Portal ID from Settings → VRM Online Portal.
- Add the installation in VRM using the Portal ID.
- Enable two-way communication if you want remote control.
Step 8: Connect the GX Touch Display (Optional)
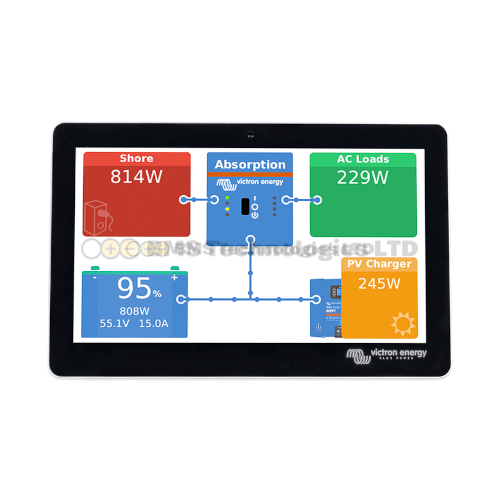
The GX Touch 50 (5-inch) or GX Touch 70 (7-inch) provides a dedicated touchscreen display for your Cerbo GX. Connect it via the HDMI and USB cables (both included with the display).
The GX Touch shows everything the Cerbo knows — system overview, battery status, solar production, AC loads, and all settings. It's the most convenient way to interact with your system locally without pulling out a phone.
Understanding the Dashboard
The main GX dashboard shows a flow diagram with:
- PV (Solar): Total solar production from all MPPT controllers
- Battery: SOC percentage, voltage, and charge/discharge current
- AC Loads: Total AC power being consumed via the inverter
- DC Loads: Total DC power being consumed directly from the battery
- Grid/Shore: AC input status (if connected via MultiPlus)
Animated flow lines show the direction of energy movement — a satisfying and intuitive way to understand your system at a glance.
Summary
Setting up a Cerbo GX involves mounting it, connecting power, plugging in your Victron devices via VE.Direct and VE.Bus cables, connecting to Wi-Fi, updating firmware, and configuring system settings (battery monitor, DVCC). Once set up, the Cerbo provides a unified view of your entire energy system — locally via a GX Touch display and remotely via the VRM portal. For any system with more than one or two Victron devices, the Cerbo GX transforms individual components into a coordinated, intelligent energy system.