Home Assistant is one of the most popular open-source home automation platforms, and it integrates beautifully with Victron Energy systems. Once connected, you can pull real-time data from your Victron system into Home Assistant dashboards, create automations based on battery state or solar production, and combine your energy data with other smart home devices. This guide covers both the cloud-based (VRM) and local (Modbus TCP) approaches.
Two Integration Approaches
There are two main ways to connect Victron to Home Assistant, each with different trade-offs:
| Approach | Connection Method | Difficulty | Latency | Internet Required |
|---|---|---|---|---|
| VRM Cloud (MQTT) | Via Victron's VRM servers | Easy | 5–30 seconds | Yes |
| Local Modbus TCP | Direct to Cerbo GX on LAN | Moderate | 1–2 seconds | No |
The VRM approach is simpler to set up and works from anywhere, but depends on an internet connection and has higher latency. The local Modbus approach is faster and works offline, but requires more configuration. Many users start with VRM and move to Modbus later when they want faster updates or offline capability.
Approach 1: VRM Integration (Cloud-Based)
This is the easiest method. It uses the Victron VRM portal's MQTT API to pull data into Home Assistant via a HACS (Home Assistant Community Store) integration.
Prerequisites
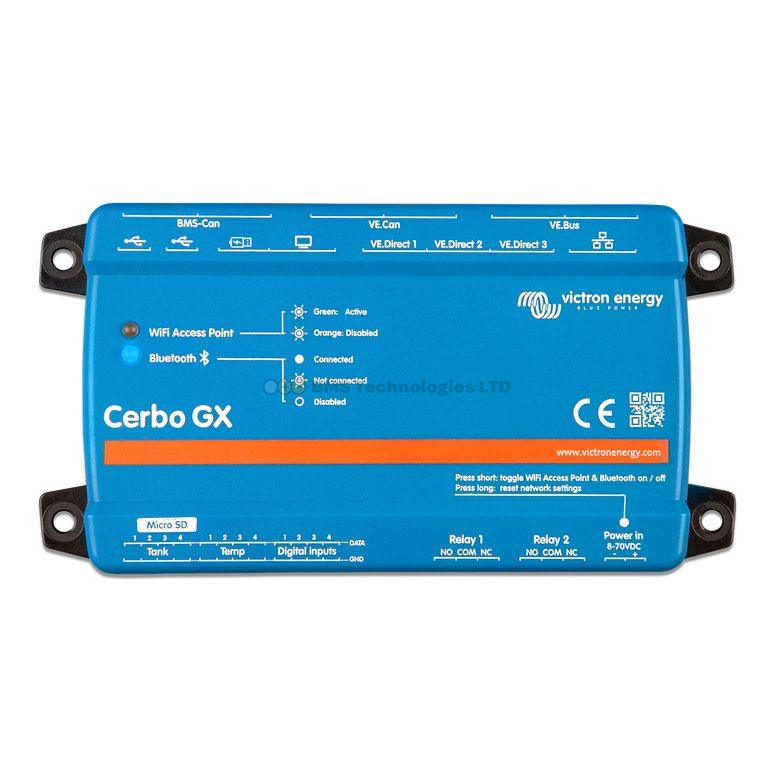
- A Cerbo GX (or other GX device) connected to VRM and uploading data
- Home Assistant installed and running (any installation method — Home Assistant OS, Docker, Supervised, or Core)
- HACS installed in Home Assistant (for the community integration)
- Your VRM username and password
Step-by-Step Setup
- Install HACS if you haven't already — follow the official HACS documentation at hacs.xyz
- In Home Assistant, go to HACS → Integrations → Explore & Download Repositories
- Search for "Victron VRM" and install the integration
- Restart Home Assistant
- Go to Settings → Devices & Services → Add Integration
- Search for "Victron VRM" and select it
- Enter your VRM email address and password
- Select your VRM installation (if you have multiple systems, choose the correct one)
- The integration will create entities for all your Victron devices
After setup, you'll find new entities in Home Assistant for battery SOC, solar power, AC loads, and more. These update every 15–30 seconds depending on your VRM data upload interval.
Approach 2: Local Modbus TCP (Direct Connection)
This approach connects Home Assistant directly to your Cerbo GX over your local network using the Modbus TCP protocol. It's faster, works without internet, and doesn't depend on VRM servers.
Step 1: Enable Modbus TCP on the Cerbo GX
- On the Cerbo GX, navigate to Settings → Services → Modbus TCP
- Toggle Enable Modbus TCP to On
- Note the IP address of your Cerbo GX (found under Settings → Ethernet or Wi-Fi)
- The default Modbus TCP port is 502
It's recommended to assign a static IP address to your Cerbo GX (either on the Cerbo itself or via a DHCP reservation on your router) so the address doesn't change.
Step 2: Add Modbus Integration in Home Assistant
Home Assistant has a built-in Modbus integration. Add it to your configuration.yaml file. Here's a basic example that reads common values from a Victron system:
You'll need to define each Modbus register you want to read. The Victron GX Modbus TCP register list is published by Victron and contains hundreds of available registers. The most commonly used ones include:
| Data Point | Unit ID | Register | Type |
|---|---|---|---|
| Battery SOC | 100 | 266 | uint16 |
| Battery voltage | 100 | 259 | uint16 (scale /100) |
| Battery current | 100 | 261 | int16 (scale /10) |
| Battery power | 100 | 263 | int16 |
| PV total power | 100 | 850 | uint16 |
| AC consumption | 100 | 817 | uint16 |
| Grid power | 100 | 820 | int16 |
Unit ID 100 represents the system overview. Individual devices (MPPT controllers, MultiPlus) have their own Unit IDs starting from 226 (for solar chargers) and 227 (for inverters). Check the Victron Modbus TCP register spreadsheet for the complete list.
Step 3: Configure Sensors
Each Modbus register becomes a sensor in Home Assistant. You'll define the register address, data type, scaling factor, and unit of measurement. The Modbus integration reads these registers at a configurable interval (typically every 5–10 seconds for a good balance between responsiveness and GX device load).
Don't poll too aggressively — reading hundreds of registers every second can slow down the Cerbo GX. A 10-second scan interval with 20–30 registers is a reasonable starting point.
What Data Can You Pull?
Both integration methods give you access to a comprehensive set of data points from your Victron system:
- Battery: State of charge (%), voltage, current, power, temperature, time to empty/full
- Solar: Total PV power (W), daily yield (kWh), individual MPPT controller data, charge state (bulk/absorption/float)
- Inverter/Charger: AC input voltage and frequency, AC output power, charger state, input current limit
- AC Loads: Total consumption in watts
- DC Loads: Total DC consumption
- Grid: Import/export power (if using an energy meter with ESS)
- System: Alarms, warnings, relay states
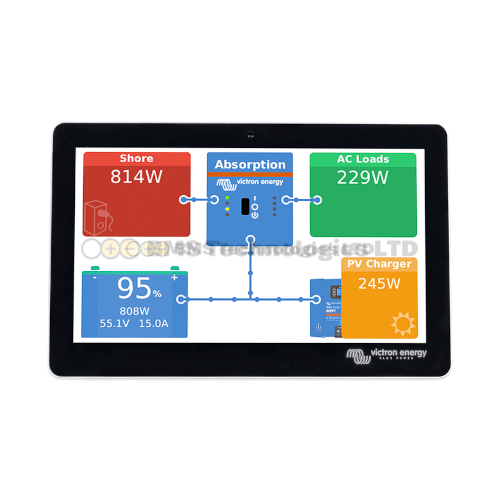
Building Dashboard Cards
Once the entities are in Home Assistant, you can create informative dashboard cards. Some effective layouts for Victron systems:
Gauge Cards
Use gauge cards for battery SOC — a circular gauge showing 0–100% is the most intuitive way to display charge state. Set colour zones: green for 50–100%, yellow for 20–50%, red for 0–20%.
Sensor Cards
Simple entity cards work well for showing current solar production, AC load, and battery power. Use the "statistics" card type for daily/weekly energy totals.
Energy Dashboard
Home Assistant's built-in Energy Dashboard can integrate Victron data if you expose solar production and grid import/export as energy sensors (kWh). This gives you beautiful daily, weekly, and monthly energy charts alongside any other energy sources in your home.
History Graphs
Line graphs of battery voltage, solar power, and AC loads over time help identify patterns — when peak solar hits, when heavy loads run, and how the battery cycles through the day.
Useful Automations
The real power of the Home Assistant integration is automation. Here are practical examples:
- Low battery notification: Send a phone notification when battery SOC drops below 25% — useful for off-grid systems where running out of power is a real concern
- Load shedding: Automatically turn off non-essential smart plugs (electric heaters, hot water immersion) when battery SOC drops below 30%, and turn them back on above 60%
- Excess solar diversion: When solar production exceeds consumption by more than 500W, turn on the immersion heater or EV charger to use the surplus rather than wasting it
- Peak solar alert: Notify when daily solar yield exceeds a new record — a fun one for solar enthusiasts
- Night-time battery check: At 10pm, if battery SOC is below 50%, send a reminder to start the generator or reduce overnight loads
- Weather-based preparation: Combine with a weather integration — if tomorrow's forecast is cloudy, reduce non-essential overnight loads to preserve battery for the low-solar day ahead
Node-RED as an Alternative
Some users prefer Node-RED (available as a Home Assistant add-on) for building Victron automations. Node-RED provides a visual flow-based programming interface that can connect to the Cerbo GX via Modbus TCP or MQTT. It's particularly good for complex logic — like multi-stage load management based on SOC, time of day, and solar forecast combined.
Troubleshooting
VRM Integration Not Updating
- Verify your Cerbo GX is uploading to VRM (check the VRM portal directly)
- Re-enter your VRM credentials in the integration settings
- Check Home Assistant logs for authentication errors
Modbus TCP Connection Refused
- Confirm Modbus TCP is enabled on the Cerbo GX
- Verify the IP address and port (502) are correct
- Check that your Home Assistant server and Cerbo GX are on the same network or subnet
- Ensure no firewall is blocking port 502
Summary
Integrating Victron with Home Assistant gives you powerful dashboards, automations, and data analysis that go far beyond what VRM alone provides. Start with the VRM cloud integration for a quick setup, then consider moving to local Modbus TCP for faster updates and offline capability. Once connected, the combination of Victron's energy management and Home Assistant's automation engine opens up intelligent energy management — from automatic load shedding to excess solar diversion.