Building a complete electrical system for a campervan is one of the most important — and most daunting — parts of any conversion. Get it right and you'll have reliable, silent power for years. This guide walks through every component in a mid-range Victron-based campervan electrical system, from batteries to monitoring, with a full wiring overview and realistic budget breakdown.
System Overview: What You Need and Why
A campervan electrical system has seven core components. Every system needs most of these, though the exact products depend on your budget and power requirements:
- Leisure battery bank — stores energy for use when off-grid
- Solar charge controller (MPPT) — converts solar panel output to battery charging
- Solar panels — generate electricity from sunlight
- DC-DC charger — charges leisure batteries from the vehicle alternator while driving
- Inverter or inverter/charger — converts 12V DC to 230V AC for mains appliances
- Battery monitor — tracks state of charge, current flow, and battery health
- System monitor (optional) — centralised monitoring and remote access
The Reference System
This guide is built around a proven mid-range campervan system that suits most full-time or frequent-use conversions:
| Component | Product | Role |
|---|---|---|
| Battery | 200Ah 12.8V Lithium (LiFePO4) | 2.56kWh usable energy storage |
| Solar Panels | 2 x 200W (400W total) | Primary off-grid charging source |
| MPPT Controller | Victron SmartSolar 100/30 | Solar charge regulation |
| DC-DC Charger | Victron Orion-Tr Smart 12/12-30 | Alternator charging while driving |
| Inverter/Charger | Victron MultiPlus 12/1600/70 | 230V power + shore power charging |
| Battery Monitor | Victron SmartShunt 500A | Accurate state of charge tracking |
| System Monitor | Victron Cerbo GX + GX Touch 50 | Central monitoring + VRM remote access |
Component 1: Leisure Batteries
Why Lithium (LiFePO4)?
For campervan use, lithium iron phosphate (LiFePO4) batteries have become the standard recommendation for good reason:
- Usable capacity: You can safely use 80–100% of a lithium battery's rated capacity vs only 50% of a lead-acid battery. A 200Ah lithium battery gives you 160–200Ah of usable energy; a 200Ah AGM gives you only 100Ah.
- Weight: A 200Ah lithium battery weighs roughly 25kg vs 60kg+ for equivalent AGM capacity.
- Cycle life: Expect 3,000–5,000 cycles from LiFePO4 vs 300–500 from AGM.
- Charge speed: Lithium accepts high charge currents right up to nearly full, while lead-acid slows dramatically above 80%.
- Flat discharge curve: Lithium maintains steady voltage throughout discharge, so your appliances perform consistently.
The downside is cost — a quality 200Ah lithium battery costs £600–£1,200, while an equivalent pair of AGM batteries might be £200–£400. However, the superior cycle life typically makes lithium cheaper over the long term.
Sizing Your Battery Bank
For most campervan conversions, 200Ah at 12V (2.56kWh) is the sweet spot. This provides enough capacity for a typical day's usage (40–80Ah) with a comfortable reserve. If your daily power usage exceeds 100Ah regularly, consider upgrading to 300Ah or more.
Component 2: Solar Panels and MPPT Controller
Solar Panels
For a mid-range system, 2 x 200W panels (400W total) mounted on the roof is ideal. This provides excellent off-grid capability across UK seasons:
- Summer (UK): Expect 150–300Wh per 100W of panel per day, so 400W of panels could generate 600–1,200Wh (50–100Ah at 12V).
- Winter (UK): Output drops to 30–80Wh per 100W, giving 120–320Wh (10–27Ah at 12V).
- Spring/Autumn: Somewhere in between — typically enough to sustain moderate daily use.
Use rigid monocrystalline panels where possible. They're more efficient and durable than flexible panels, though flexible panels are an option for curved roofs where rigid mounting isn't practical.
Victron SmartSolar MPPT 100/30
The SmartSolar 100/30 is the ideal controller for this system. The numbers mean: 100V maximum solar input voltage, 30A maximum charge current. For a 400W array on a 12V system, this controller has comfortable headroom.
MPPT (Maximum Power Point Tracking) extracts significantly more energy from your panels than a cheaper PWM controller — typically 15–30% more, especially in low-light conditions and when panel voltage is well above battery voltage.
Component 3: DC-DC Charger (Alternator Charging)
The Victron Orion-Tr Smart 12/12-30 charges your leisure batteries from the vehicle's alternator while driving. This is essential because:
- Modern Euro 6 vehicles use smart alternators that vary voltage, making simple split-charge relays unreliable for lithium batteries
- Lithium batteries need a properly regulated charge profile that a DC-DC charger provides
- The Orion-Tr Smart limits current draw from the alternator, protecting it from overload
At 30A, a typical hour of driving adds roughly 30Ah to your leisure batteries — enough to offset a moderate day's usage. On a long driving day (4–5 hours), you can essentially charge your batteries from empty to near-full.
The Smart version includes Bluetooth for monitoring via VictronConnect and can be programmed to start/stop based on engine detection voltage thresholds.
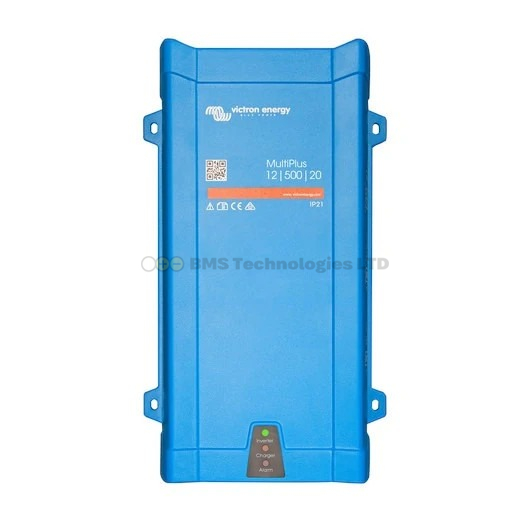
Component 4: Inverter/Charger (MultiPlus)
Why MultiPlus Instead of a Standalone Inverter?
The Victron MultiPlus 12/1600/70 combines three functions in one unit:
- Inverter: 1,600VA of 230V AC power from your batteries for mains appliances
- Battery charger: 70A charger for shore power (campsite hookup) charging
- Transfer switch: Automatically switches between shore power and inverter power, so your AC sockets always work
The 12/1600/70 designation means: 12V battery system, 1,600VA continuous output, 70A charger. This is sufficient for most campervan needs — running a coffee machine, microwave, hair dryer (on low), laptop chargers, and other moderate AC loads.
PowerAssist
A unique MultiPlus feature: PowerAssist supplements weak shore power with battery power. If you're on a European campsite with only 6A hookup (1,380W) and try to use a 1,200W appliance while the charger is running, the MultiPlus draws the extra power from batteries rather than tripping the campsite breaker.
Component 5: Battery Monitor (SmartShunt)
The Victron SmartShunt 500A is the brain of your battery monitoring. It measures every amp going in and out of your batteries and calculates a precise state of charge percentage.
Without a battery monitor, you're guessing. Voltage alone is a very poor indicator of lithium battery state of charge because the voltage curve is almost flat between 20% and 80% SOC.
The SmartShunt connects via Bluetooth to VictronConnect and can also feed data to a Cerbo GX. The 500A rating refers to the shunt's maximum measurable current — far more than you'll ever draw in a campervan, but it means the shunt has no practical limitation.
Component 6: System Monitor (Cerbo GX)
The Cerbo GX is optional but transforms your system. It connects to all your Victron devices (MPPT, MultiPlus, SmartShunt, Orion-Tr) via VE.Direct and VE.Bus cables and provides:
- Centralised display: Paired with a GX Touch 50 screen, you see all system data at a glance — battery SOC, solar yield, shore power status, AC loads, DC loads
- VRM remote monitoring: View your system from anywhere via the internet (requires a WiFi connection or mobile data)
- System coordination: The Cerbo GX ensures all devices work together optimally
- Data logging: Historical data on energy production, consumption, and battery health
If budget is tight, you can skip the Cerbo GX initially and use VictronConnect Bluetooth to monitor individual devices. The Cerbo GX can be added later without rewiring — you just connect the data cables.
Wiring Overview
The wiring for a campervan electrical system follows a logical structure. While we won't provide a wiring diagram here (always consult a qualified auto-electrician for your specific installation), this overview describes how the components interconnect:
Battery Connections
The leisure battery is the central hub. All charging sources feed into it, and all loads draw from it. Use appropriately rated cables and fuses for every connection. For a 200Ah lithium system with a MultiPlus 12/1600, the main battery cables should be at least 50mm2 copper with a 200A fuse at the battery positive terminal.
Charging Sources
- Solar panels connect to the MPPT controller input (PV side), which outputs to the battery via fused DC cabling (typically 6mm2 or 10mm2 depending on current).
- Orion-Tr Smart DC-DC charger connects on the input side to the vehicle starter battery (via the vehicle fuse box or a dedicated fused connection) and on the output side to the leisure battery.
- MultiPlus connects to the battery via heavy-gauge cables (35–50mm2) with appropriate fusing. The AC input connects to the shore power inlet via the vehicle's consumer unit.
Load Distribution
A 12V fuse box distributes power from the battery to all 12V loads: LED lighting, USB sockets, water pump, fridge, diesel heater, and vent fans. Each circuit has its own fuse for protection. The MultiPlus provides 230V AC via a separate consumer unit with MCBs and an RCD.
Data Connections
The SmartShunt connects to the Cerbo GX via a VE.Direct cable. The MPPT controller also connects via VE.Direct. The MultiPlus connects via a VE.Bus cable. These data cables carry only low-voltage signals and can be routed alongside power cables without concern.
Budget Breakdown
Realistic UK pricing for the reference system in 2024–2025 (shop around using our price comparison tool to find the best deals):
| Component | Budget Range | Notes |
|---|---|---|
| 200Ah LiFePO4 battery | £600 – £1,200 | Price varies hugely by brand |
| 2 x 200W solar panels | £200 – £400 | Rigid monocrystalline recommended |
| SmartSolar MPPT 100/30 | £130 – £180 | Compare prices across retailers |
| Orion-Tr Smart 12/12-30 | £120 – £170 | Non-isolated version is fine for most vans |
| MultiPlus 12/1600/70 | £550 – £750 | Biggest single Victron expense |
| SmartShunt 500A | £55 – £80 | Essential, don't skip this |
| Cerbo GX + GX Touch 50 | £300 – £450 | Optional but highly recommended |
| Fuse box, fuses, busbars | £50 – £120 | Don't cheap out on safety components |
| Cabling (various gauges) | £80 – £200 | 50mm2, 16mm2, 6mm2, 2.5mm2 |
| Consumer unit + MCBs | £40 – £80 | For 230V AC distribution |
| Mounting, connectors, misc | £50 – £150 | MC4 connectors, cable glands, trunking |
Total estimated range: £2,175 – £3,780
The biggest cost variable is the lithium battery. The Victron components themselves are well-priced if you shop around, and our price comparison makes it easy to find the cheapest UK retailer for each item.
Installation Tips
- Plan your layout first. Mount the MultiPlus near the battery (short heavy cables), the MPPT near the roof entry point (short solar cables), and the fuse box in an accessible location.
- Ventilation matters. The MultiPlus generates heat under load. Ensure airflow around it — don't box it in completely.
- Cable sizing is critical. Undersized cables cause voltage drop, heat, and potentially fire. Use a cable sizing calculator and always err on the side of larger gauge.
- Fuse everything. Every positive cable leaving the battery should have a fuse within 300mm of the battery terminal.
- Consider professional installation. If you're not confident with electrics, hiring a qualified auto-electrician for the main wiring is money well spent. Mistakes with high-current DC systems can cause fires.
For a more budget-conscious approach, see our guide on building a Victron campervan system on a budget. For help calculating exactly how much battery and solar you need, start with our daily power usage calculator guide.